Garage Utility Wall Cabinets for Panel and Water Heater
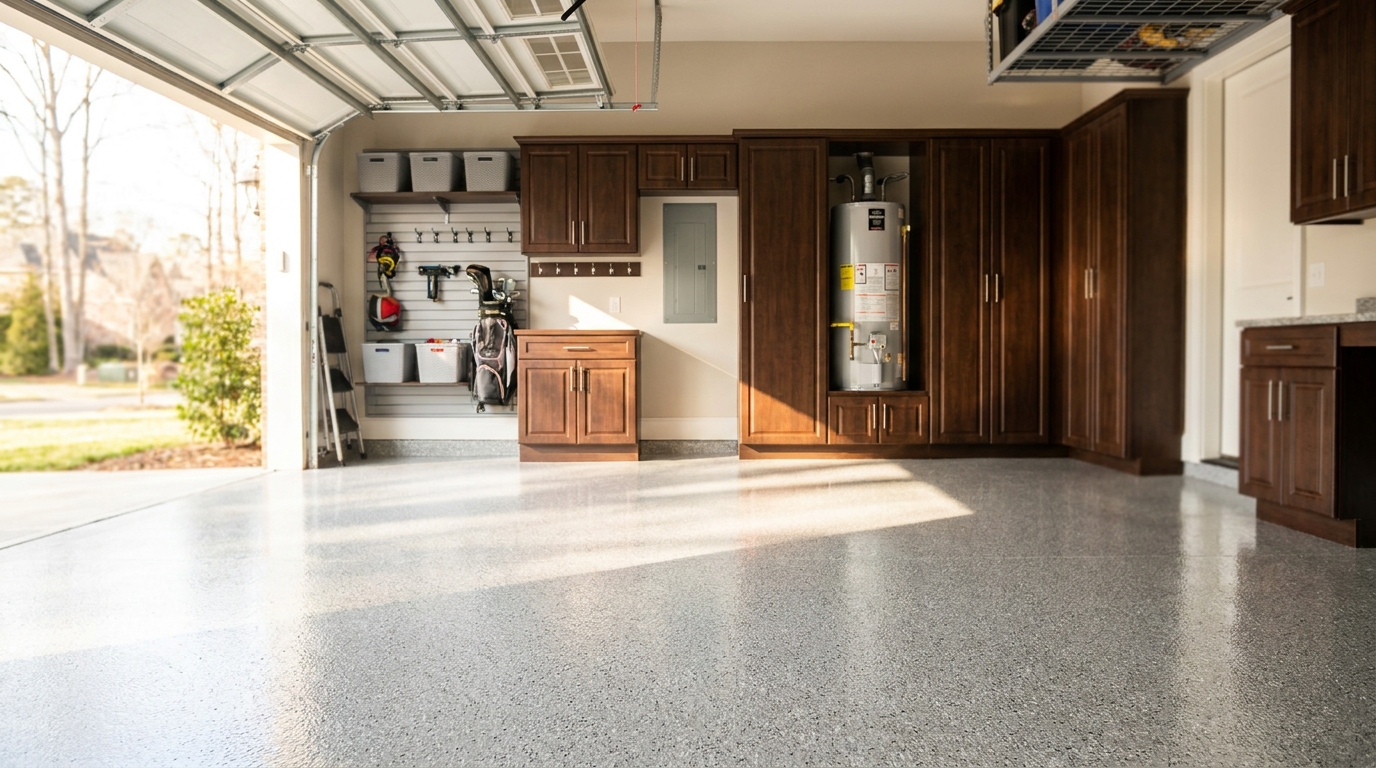
A finished garage treats the electrical panel, water heater, and HVAC as one designed elevation, with matching fillers and service doors so the cabinet run still reads as a single room. We plan garage utility wall cabinets around those pieces instead of stopping the millwork at the first piece of equipment. The 2024 International Residential Code sets a clear working space in front of a typical panelboard at not less than 36 inches deep, 30 inches wide (or the width of the equipment, whichever is greater), and 6.5 feet high, and that box stays open.[1] The wall around it can still look like cabinetry.
Treat the equipment as part of the room
In a lot of Charlotte, Waxhaw, and Monroe houses, the nicest wall in the garage is the one nobody designed. The panel, water heater, and air handler already live there. They are the architecture of that elevation. When we draw the room, we measure those units first, the same way we measure the overhead door and the parking stall, then we let the cabinets, fillers, and doors complete the wall.
That is a different question from whether you buy storage over several years. This wall is one composition. The finish, the door style, the top line, and the filler pieces should match from corner to corner, including the openings that stay in front of the equipment.
Our team uses heat-fused laminated melamine cabinetry, wall-mounted with optional legs, so the floor coating can run under the boxes and the elevation sits on a finished slab. Signature Series cabinets use 1-inch tops, bottoms, and shelves with 3/4-inch doors, drawer fronts, and side panels. Soft-close hinges and full-extension drawers keep the wall quiet. Each interior shelf is rated to 100 lb. Outlets, switches, and panels stay accessible. The equipment does not disappear. It gets a frame.
Frame the panel, keep the working box
The panel is the most precise opening on the wall, because the working space in front of it is a three-dimensional box, not a polite gap. OSHA's electrical standard for equipment at 600 volts or less requires a working space at least 30 inches wide (or the width of the equipment, whichever is greater), deep enough to meet Table S-1, and tall enough for 6.5 feet of headroom on installations built on or after August 13, 2007, unless the equipment itself is taller.[2] For 0 to 150 volts to ground, that table's minimum depth is 3.0 feet in every listed condition, which is the 36-inch depth homeowners hear about most often.[2] The 2024 IRC states the same 36-inch depth, 30-inch width, and 6.5-foot height for panelboards, and it requires enough room for equipment doors or hinged panels to open at least 90 degrees.[1]
Stanford's SLAC electrical-safety manual, which restates NFPA 70 Article 110.26, adds a few details that help the cabinet layout. The 30-inch width may be centered on the panel or offset. The working space must stay clear to the floor. It must not be used for storage. Other equipment associated with the electrical installation may project no more than 6 inches beyond the front of the panel within that height.[3]
We treat that box as a designed void. Cabinets can run to the left and right of it. A matching filler or a framed surround can finish the wall plane around the panel cover, so the laminate continues even where there is no door. What we do not do is park a tall cabinet, a rolling toolbox, or a shelf of paint in that 36-inch depth. OSHA and the IRC both say the required working space may not be used for storage.[1][2]
There is a second, quieter zone that affects overhead storage. Indoor dedicated panelboard space is the width and depth of the panel itself, extending from the floor to 6 feet above the enclosure or to the structural ceiling, whichever is lower. Piping, ducts, and other equipment foreign to the electrical installation stay out of that dedicated volume.[1] OSHA uses the same 6-foot dedicated height above indoor switchboards, panelboards, and similar equipment.[2] That is why we do not hang a cabinet, a duct chase, or a water line in the column of space directly above the panel. The cabinets on either side can still rise to a consistent top line. The opening above the panel can be a matching filler, a lighted reveal, or simply finished wall in the same palette. The elevation still reads as one.
Lighting belongs in this conversation. The IRC requires artificial illumination for indoor working spaces at service equipment and enclosed panelboards, and that lighting must not be controlled by automatic means only. OSHA says the same.[1][2] A dedicated switch at the utility wall, or a light with a manual override, keeps the panel readable and makes the elevation feel finished after dark.
Cabinet doors next to the panel need a little choreography. The panel cover has to open 90 degrees. A nearby cabinet door should not collide with it. We set door swings, filler widths, and handle locations while the 3D layout is still on screen.
Give the water heater a service alcove
The water heater wants a different kind of opening: not a code cube in front of a dead-front cover, but a level service space on the control side, with a path to observe, maintain, service, and replace the tank. North Carolina's 2024 residential code says water heaters and storage tanks shall be located and connected to provide that access, and it points to the mechanical access rules in Section M1305.[4] The 2024 International Plumbing Code is more dimensional. Appliances must be accessible for inspection, service, repair, and replacement without disabling a fire-resistance-rated assembly or removing permanent construction, other appliances, or piping and ducts that are not connected to the unit being serviced. A level working space not less than 30 inches long and 30 inches wide belongs in front of the control side.[5]
The same 30-by-30-inch service space shows up at the front or service side of a water heater in the attic and crawl-space sections of that chapter, and the idea is even more visible when the tank sits on a garage slab or stand.[4] The alcove we draw is a finished pocket: matching interior panels, a removable front that looks like the rest of the cabinet run, and a clear 30-by-30-inch patch of floor in front of the controls, drain, and relief piping.
Two more rules shape the pocket. Water heaters with an ignition source must sit so that source is not less than 18 inches above the garage floor, unless the appliance is listed as flammable vapor ignition-resistant (FVIR).[4] The same 18-inch elevation applies to other garage appliances with an ignition source, again with an FVIR exception.[6] If the tank is on a stand, the cabinet work wraps the stand. It does not hide the elevation or turn the stand into a catch-all shelf.
Relief-valve hardware stays in the open. North Carolina's residential plumbing chapter requires a temperature, pressure, or combination relief valve, with discharge piping that is not trapped, flows by gravity, and terminates where occupants can see it.[4] A U.S. Department of Energy weatherization job aid from June 2024, written for insulating electric tanks, still makes the access point for cabinet design: added material must not obstruct the temperature and pressure relief valve, thermostats or other controls, or access plates.[7] If a blanket should not cover those parts, a decorative door certainly should not lock them away. We cut the false front so the T&P valve, drain, and electrical disconnect remain reachable without tools that demolish the millwork.
The removable panel is the whole trick. It should look like a tall cabinet door, in the same heat-fused laminate and the same hardware family as the lockers beside it. It should come off, or swing fully, so a plumber can drain the tank and walk it out. That is the IPC point about not removing permanent construction to replace the appliance.[5] A nailed-on box-out that has to be sawn apart on replacement day is not a designed elevation. A matching, removable face is.
Combustion air, vent connectors, and condensate lines stay on the do-not-bury list. If the water heater is gas-fired, the cabinet pocket cannot become a sealed closet unless the listing and the fuel-gas chapter allow that arrangement. The finished look comes from aligned fillers and a consistent top line, not from stuffing the tank into a too-small wardrobe.
Design HVAC access as part of the same run
Furnaces, air handlers, and similar appliances follow the same access logic. North Carolina's 2024 residential mechanical chapter requires appliances to be accessible for inspection, service, repair, and replacement without removing permanent construction, other appliances, or piping and ducts not connected to the unit. A level working space not less than 30 inches deep and 30 inches wide belongs in front of the control side.[6] If the equipment sits in a compartment or alcove, the opening or door and the passageway must be at least 24 inches wide and large enough to remove the largest appliance, with a level service space at least 30 inches deep and at least as tall as the appliance (and not less than 30 inches) at the front or service side with the door open.[6]
The HVAC closet can wear the same doors as the rest of the utility wall. The doors have to be wide enough, and they have to open onto that 30-inch service space. Filter racks, blower compartments, and electrical disconnects stay reachable. If the unit is in the garage and has an ignition source, the 18-inch elevation rule still applies unless it is listed FVIR, and appliances in the normal path of vehicle travel need impact protection or a 6-foot clearance above the floor.[6]
Clearances to combustibles include door swing, drawer pull, overhead projections or shelving, and similar moving parts. Doorstops do not count as the required clearance.[6] A drawer bank next to a furnace cannot pull into the listed side clearance, and a slatwall shelf cannot hover in the listed top clearance. If a return grille has to stay on the wall, we frame it with a matching filler. If a filter door is in the side of an air handler, the neighboring cabinet leaves that door a full swing.
Matching fillers, aligned heights, one continuous wall
Fillers are the quiet material that makes garage utility wall cabinets look like a room. A filler is a finished strip or panel, in the same laminate as the doors, that closes the gap between a cabinet box and a panel, a tank, a duct, a corner, or a door trim. Without fillers, you see raw box sides, leftover drywall, and a utility wall that stops and starts. With them, the millwork has a single plane.
We align three lines on this wall. The top line of the tall cabinets, the filler above the panel opening, and the top of the water-heater alcove should meet. The vertical lines of doors, false doors, and the panel surround should share a rhythm, even if the openings are different widths. The bottom line should be consistent too. Wall-mounted boxes with optional legs let the finished floor run underneath, so the toe space is a shadow line rather than a mop-catching kick. That is a small thing that makes the elevation feel like furniture.
The panel surround is usually a U-shaped or picture-frame filler, sized so the cover can come off and the 90-degree swing is free. The water-heater face is a tall removable door or a pair of doors. The HVAC face is a pair of doors wide enough for the 24-inch passageway and the 30-inch service space. Between those openings, real cabinets do the storage work: lockable uppers for household chemicals, drawers for batteries and fasteners, a tall locker for brooms and the shop vac. The fillers are not leftover scraps. They are cut from the same heat-fused laminate, with the same edge, so a guest cannot tell which door opens on a shelf and which door opens on a tank.
This is still one wall, designed on one visit. You can add a workbench or overhead racks later on other walls. The utility elevation should be drawn as a complete composition from the start, because the panel and the water heater are not moving.
Let the floor finish the elevation
A utility wall looks finished when it sits on the same floor as the rest of the garage. Our floor system is a hybrid coating: an epoxy primer, a decorative chip broadcast, and a polyaspartic top coat. The coating turns the panel working space and the appliance service patches into clean, wipeable floor. Because the cabinets are wall-mounted, the coating can pass under the boxes, so the utility wall and the parking stall share one surface. Organization on the rest of the room can then follow the same palette. The utility wall is the first elevation we draw, and the rest of the garage takes its cues from it.
Practical takeaways
- Draw the panel, water heater, and HVAC as one elevation, then let garage cabinets and matching fillers complete the wall.
- Keep a clear working space in front of the panel: 30 inches wide (or the equipment width), 36 inches deep, and 6.5 feet high, with a 90-degree cover swing and no storage in that box.[1][2][3]
- Leave the dedicated column above the panel (the width and depth of the enclosure, 6 feet up or to the structural ceiling) free of cabinets, ducts, and unrelated piping.[1][2]
- Give the water heater a 30-by-30-inch level service space on the control side, with a removable matching face so the tank can be serviced or replaced without tearing out millwork.[4][5]
- Keep the T&P valve, drain, thermostats, and access plates unobstructed, and honor the 18-inch ignition-source height in the garage unless the appliance is listed FVIR.[4][6][7]
- Treat HVAC the same way: 30-by-30-inch control-side working space, doors wide enough to remove the unit, and listed clearances that account for drawer pulls and door swings.[6]
- Align one top line, one bottom line, and one laminate across real doors, false doors, and fillers so the run still looks like a single room.
- Use wall-mounted cabinets with optional legs so the epoxy primer, chip broadcast, and polyaspartic top coat can run under the elevation.
How we can help
Our team comes to your Charlotte-area garage, measures the panel, water heater, HVAC, and every outlet on that wall, and draws the elevation as one composition before anything is built. You will see the fillers, the service doors, and the cabinet run in 3D, with the working boxes left open on purpose. Have more questions or want to get in touch? Contact us
Citations
- International Code Council, "2024 International Residential Code, Chapter 34, Sections E3405.1 through E3405.7" (2024)
- Occupational Safety and Health Administration, "29 CFR 1910.303 General, Space about electric equipment" (current; headroom clause for installations on or after 2007-08-13)
- SLAC National Accelerator Laboratory, Stanford University, "Electrical Equipment Working Space Requirements" (2025-03-14)
- North Carolina Building Code Council / ICC, "2024 North Carolina State Building Code: Residential Code, Chapter 28 Water Heaters" (2024)
- International Code Council, "2024 International Plumbing Code, Section 502.5 Clearances for maintenance and replacement" (2024)
- North Carolina Building Code Council / ICC, "2024 North Carolina State Building Code: Residential Code, Chapter 13, Sections M1305 and M1307" (2024)
- U.S. Department of Energy, State and Community Energy Programs, "Insulate an Electric Domestic Water Heater (Job Aid 23-1)" (2024-06)